Mastering the Art of 3D Christmas Village Scene Laser File Projects
The holiday season brings with it a wave of nostalgia, warmth, and a desire to create meaningful, lasting decorations. For woodworkers, laser engravers, and CNC enthusiasts, this time of year offers a unique opportunity to blend traditional craftsmanship with modern digital fabrication. The 3D Christmas Village Scene Laser File represents a significant leap forward in creating intricate, dimensional holiday decor that captures the essence of a cozy winter wonderland. This premium bundle is not merely a collection of images; it is a comprehensive toolkit designed for high-quality laser engraving and CNC carving, allowing creators to produce stunning wall art, decorative plaques, and festive shadow boxes.
Whether you are operating a Glowforge, an xTool device, or a robust CNC router, these files are optimized to guide your machine through complex depth variations. The result is a realistic wood-carving style that adds texture, depth, and authenticity to your finished products. In this guide, we will explore the technical specifications, practical applications, and creative potential of these detailed snowy village scenes, helping you understand how to leverage this resource for both personal enjoyment and commercial success.
Understanding the Technology Behind 3D Relief Engraving
To fully appreciate the output of a 3D Christmas Village Scene Laser File, it is essential to understand the underlying technology of relief engraving. Unlike standard vector engraving, which creates flat designs by burning or etching the surface, relief engraving uses grayscale or height-map data to control the depth of the cut. This process transforms a two-dimensional image into a three-dimensional object with tangible texture.
The files included in this bundle utilize a sophisticated depth map system. Each design is paired with a corresponding grayscale PNG file. In this system, white pixels represent the highest points (the surface level), while black pixels indicate the deepest cuts. Various shades of gray in between dictate the intermediate depths. When your laser software interprets these values, it adjusts the power, speed, or Z-axis movement accordingly, resulting in a rich, professional look that mimics hand-carved wood.
The Importance of High Resolution
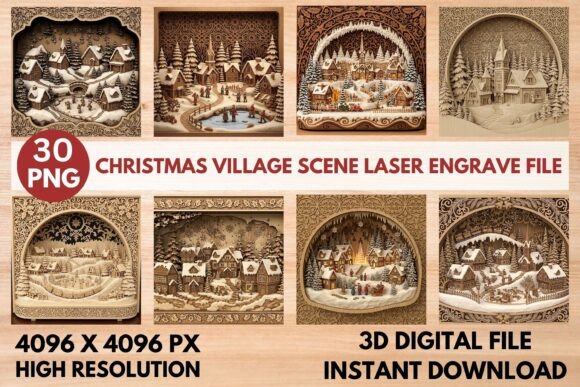
Detail is paramount when working with relief maps. A low-resolution file can lead to jagged edges, loss of fine details, and a muddy final appearance. That is why every file in this collection is provided at a massive 4096 x 4096 PX. This high resolution ensures that even the smallest elements—such as the individual shingles on a church roof, the branches of a Christmas tree, or the facial expressions of carolers—are rendered with exceptional sharpness. For projects of any size, from small keychains to large wall installations, this pixel density guarantees clarity and precision.
What’s Inside the Bundle: A Technical Breakdown
The value of this collection lies in its completeness. It is not just a set of images but a dual-format package designed to streamline your workflow from design to production. Here is a closer look at the components that make up this versatile resource.
- 15 Unique Full-Color Designs: The bundle includes 15 distinct, high-resolution color PNGs. These are not only useful for visualizing the final product but also serve as excellent assets for marketing materials, social media promotions, and vibrant full-color prints if you choose to use them in mixed-media projects.
- 15 Corresponding Grayscale Relief Maps: These are the functional heart of the bundle. Each color design has a dedicated grayscale version that guides the laser or CNC machine. These maps are crucial for achieving the intricate, dimensional 3D carved effect. They ensure that the snow-covered roofs, deep shadows under eaves, and textured tree bark are accurately translated into physical depth.
- Non-Transparent PNG Format: All files are delivered as non-transparent PNGs. This format choice prioritizes broad compatibility. Whether you are using LightBurn, RDWorks, Chitubox, or other major laser software platforms, you can import these files directly without needing to strip backgrounds or adjust alpha channels, saving valuable setup time.
Creative Applications and Use Cases
The versatility of the 3D Christmas Village Scene Laser File allows for a wide range of applications. Creators can experiment with different materials and formats to suit their specific needs and aesthetic preferences. Below are some of the most popular ways to utilize these intricate designs.
Festive Wall Art and Shadow Boxes
One of the most striking applications is the creation of multi-layered shadow boxes. By cutting out the main village scene from one material and layering it against a contrasting background, you can create a sense of profound depth. For example, a dark walnut background with a lighter maple village scene can create a dramatic silhouette effect. Alternatively, using translucent acrylic for the foreground elements can add a modern twist to the traditional wooden aesthetic.
Decorative Plaques and Ornaments
Smaller-scale projects benefit greatly from the high detail of these files. Creating decorative plaques for mantels or shelves allows you to showcase the intricate textures of the houses and churches. The deep carving effect highlights the architectural details, making each plaque a conversation piece. Similarly, these files can be scaled down for hanging ornaments, though care must be taken to maintain structural integrity during the cutting process.
Commercial Holiday Decor
For business owners and makers selling holiday goods, this bundle offers a scalable solution. The consistent quality and professional finish of the 3D relief engravings allow for the production of premium-priced items. You can create sets of matching coasters, cutting boards, or gift tags featuring the same village theme, providing customers with cohesive holiday merchandise. The inclusion of promotional-ready color mockups further aids in marketing these products effectively online.
Material Considerations and Best Practices
While the files are universally compatible, the choice of material significantly impacts the final outcome. Understanding how different substrates interact with laser engraving or CNC routing is key to achieving the best results.
Wood: The Classic Choice
Natural wood remains the most popular material for relief engraving due to its warm tone and ability to hold fine detail. Softwoods like basswood and birch plywood offer smooth surfaces that are easy to engrave, while hardwoods like cherry, walnut, and maple provide durability and a richer color contrast. When engraving wood, consider the grain direction; aligning the design parallel to the grain can sometimes enhance the texture, but perpendicular alignment often provides a more uniform look. Sanding the engraved surface lightly after processing can remove soot and reveal the crispness of the carved lines.
Slate and Stone
Slate offers a sleek, modern alternative to wood. The dark gray color of slate provides a stunning contrast when the surface is engraved, as the laser burns away the top layer to reveal a lighter shade underneath. The 3D Christmas Village Scene Laser File works exceptionally well on slate, where the depth variations create a subtle yet elegant tactile experience. However, stone requires different power settings and potentially water cooling to prevent cracking, so adjustments to your machine’s parameters are necessary.
Acrylic and Other Plastics
Acrylic can produce vibrant, glass-like results. Clear acrylic engraved with these files can take on a frosted appearance, while colored acrylics can yield striking visual effects. Keep in mind that plastics may require lower power settings to avoid melting or excessive smoke. Additionally, the reflection of light off the engraved surfaces can add a sparkling, wintry feel to the village scene, enhancing the festive theme.
Workflow Optimization for Creators
Efficiency is crucial, especially during the busy holiday season. To maximize productivity when using the 3D Christmas Village Scene Laser File, follow these workflow tips.
- Software Setup: Import the grayscale PNG into your laser software (e.g., LightBurn). Ensure that the image mode is set to "Grayscale" or "Halftone" depending on your machine’s capabilities. For raster engraving, verify that the DPI matches the resolution of your source file (4096px) to maintain detail.
- Test Runs: Always perform a test engraving on a scrap piece of your chosen material. Adjust the power and speed settings to achieve the desired depth. Too much power can burn through thin areas, while too little may fail to create sufficient contrast.
- Layering Strategy: If you are creating multi-layered pieces, plan your layers carefully. Assign different depth levels to different colors in the grayscale map. For instance, assign darker grays to the background elements (like distant trees) and lighter grays to the foreground (like the main houses) to create a natural perspective.
- Post-Processing: After engraving, clean the pieces thoroughly. For wood, apply a clear coat or wax to protect the surface and enhance the color. For slate, a simple wipe-down may suffice. Proper finishing touches elevate the perceived value of the final product.
Why Choose This Collection?
In a market saturated with basic vector designs, the 3D Christmas Village Scene Laser File stands out for its complexity and realism. The attention to detail—from the snow-laden branches to the intricate window frames—ensures that your projects do not look mass-produced but rather artisanal and handcrafted. The inclusion of both color and grayscale files reduces the barrier to entry for beginners who might struggle to generate their own depth maps, while still offering enough flexibility for advanced users to tweak settings for unique effects.
Furthermore, the compatibility with popular machines like Glowforge, xTool, and various CNC routers ensures that you are not locked into a specific ecosystem. This flexibility makes the bundle a worthwhile investment for hobbyists looking to upgrade their holiday decor and professionals aiming to expand their product line with high-margin, detailed items.
Conclusion
The holidays are a time for connection and creativity. By utilizing the 3D Christmas Village Scene Laser File, you bring a touch of old-world charm into your modern workshop. Whether you are crafting a heartfelt gift for a loved one or producing a collection of bespoke decorations for sale, these files provide the tools necessary to create something truly special. With their high resolution, versatile format, and stunning 3D relief potential, they offer endless possibilities for bringing the magic of a snowy village to life in wood, stone, and beyond.